Building my D-50
My earlier post about the Roland D-50 synthesizer looked at the history and impact of this unique synthesizer. I had missed the one I owned and sold in 1994. Market prices for good condition D-50s are high so I had hit on a way to get one: buy two!!! I bought two broken D-50s sold for ‘spares or repair’ for £15 each.
Once I had taken them home, I asked myself how I was going to make the repair.
Baron Frankenstein was known for taking parts from the deceased, stitching them together into a new creation and using electricity to bring it to life. Looking at my two dead D-50s, I decided that was my plan for them, too. It’s just as well that I like horror films and mad scientists…
When I was a child, my grandfather had shown me how to repair transistor radios. It was exciting to hear them working again after tracing the problems and replacing faulty parts. That was my apprenticeship in electronic engineering. Beyond that, I was going to learn for myself how to make my ‘Frankenstein D-50’ and bring it to life.
The Plan
Before I began taking the dearly departed synths apart, I needed to diagnose the ‘causes of death.’
The first had sound engine faults. Every sound was glitchy or heavily distorted. The display screen only showed random characters and lines. Some switches below the screen needed to be pressed repeatedly to elicit any response. It had keys that were cracked or chipped but each key did trigger a note when pressed. The aftertouch, where the player pressed down on a key after the original keystrike to introduce vibrato or other performance effects, worked too, as did the ‘bender’, Roland’s performance control to the left side of the keyboard. The top panel was very clean and shiny, suspiciously so when the rest of the instrument was scruffy with some screws missing from the underside. Why had the top been so meticulously cleaned up?

The second D-50 made sounds correctly, although the left channel output jack socket was crackly. The headphones output socket had no crackling, it showed the basic sound of the instrument to be detailed and smooth. This indicated good internal circuitry but a problem with the left jack. The screen was bright, all characters displayed correctly. However, nine notes across the keyboard failed to sound, a few keys were chipped on the underside. The ‘bender’ felt worn and its action was loose. The instrument’s case was scuffed on the underside, back panel and one of the plastic end cheeks, the other panels were undamaged.
So this is what I had to deal with:
| D-50 A | D-50 B |
| Bad sound engine | Good sound engine |
| Faults in display | Display working |
| Bottom row of switches unreliable | All switches good |
| Some chipped keys | Some chipped keys |
| Keybed working | 9 keys not working |
| Case intact, top panel very clean | Case worn in some panels |
| Screws missing | Crackly left jack output |
| Bender working well | Bender worn |
My plan was therefore to disassemble the instruments, repair or discard the parts with faults and build up a single synthesizer from the working parts or best parts from each. I was aware that upon opening the instruments, I may discover other issues.
How was I to strip down a pair of D-50s and rebuild a new one from them? The internet is our friend! I downloaded the D-50 Service Notes from SynthXL.com and studied the assembly of the D-50.
Preparation
I cleared a space for each synthesizer in a room where nobody else would go. I wanted everything undisturbed if I had to take breaks or leave the project overnight .
I left plenty of space to lay out parts in order and see where everything was at a glance. I cleaned the entire area so no dust would find its way into the synths.
I gathered the tools I’d need, including screwdrivers, pliers, tweezers, cleaning materials, brushes, contact cleaning sprays, magnifiers, mini vacuum cleaners, air duster sprays, testing meters, soldering iron, sticky tape, cable ties, cutting tools, pen and paper, camera, tea and biscuits.
Strip-down and Rebuild
At every stage of the job, I took photos to reference how to reassemble the instruments. I also wore an anti-static earthing wristband whenever I handled the electronics parts to prevent them from being damaged by static electricity.
I stretched out two long parallel strips of 5cm wide sticky tape on the top of my bureau/workbench with the sticky side upwards.
I cleaned each D-50 and laid them face-down for access on a couple of thick soft towels to prevent scratches. Following the Service Notes, I unscrewed all the screws on the underside of the synths. I placed each screw on the sticky tape in the same layout as on the synthesizers, so I could see where each screw came from.

I removed the bottom cover of each synthesizer and identified each part from the service notes. I took pictures and careful notes of the wiring looms and how they were fitted. Both instruments had 32 years worth of dust and dirt inside; I vacuumed them, using a paintbrush to dislodge the dust.
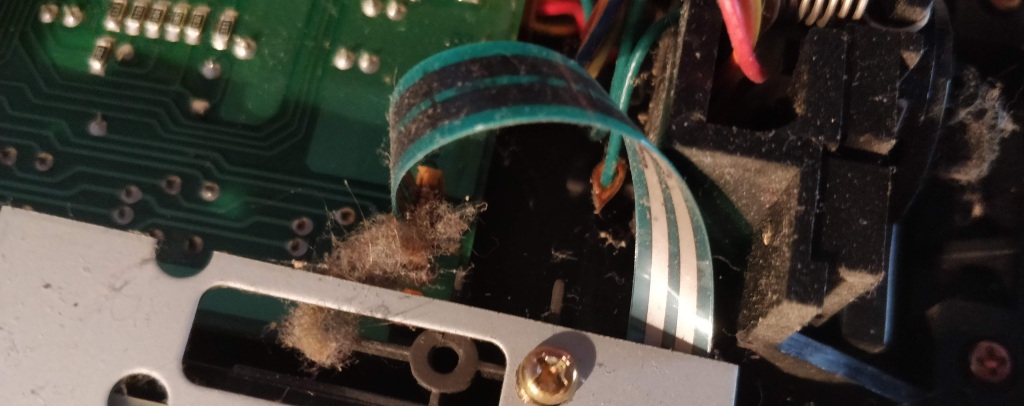
Several circuit boards and associated wiring were removed to gain access to the keybeds. As with the screws, I set each part aside in the order I removed them.
There was dried-on residue of a brown liquid that had been spilt into the keyboard of D-50 A, ran along the framework and into the innards of the synthesizer. Cleaning it off with damp cotton buds, it smelt of beer. It seems that under previous ownership, a drink had been spilt into the synth and someone had tried to clean it from the outside. I had solved the mystery of why the top panel was clean compared to the rest. Perhaps the missing screws from the back panel were a result of an attempt to clean the insides too. What else had that beer done to the D-50?

I levered the main synthesizer board up and discovered a track of dried beer and corrosion running along the base of the board, it had flowed between the board and its copper shielding and soaked the pins of several chips on the board.

The beer must have short-circuited the board. The synthesizer control chip and chorus chip were particularly badly damaged. This was the reason why Synthesizer A did not make sounds as it should. There was also dried beer in the switch panel and display boards. It rendered those boards unusable.

The keybeds are complex – each key is clipped in place at its hinge and tensioned with a spring. There are several different shapes of key and correspondingly different springs. The keys press through a felt strip onto a set of rubber membranes which have carbon contacts attached to them. Notes are triggered when the carbon is pressed against matching contacts on a circuit board in the keybed housing, read by the dynascan board. Aftertouch is triggered by further key pressure on another sensor contact. The contacts were full of dust and dirt.

I disassembled keybed A, the working one, and thoroughly cleaned it as I went. I removed each key and spring, cleaning the springs and laying them down on the sticky tape in the correct order. I stripped off the rubber membranes and cleaned the carbon contacts with contact cleaner. To ensure the circuit boards worked well, I cleaned them and re-coated the contact pads with a very soft pencil, the graphite lubricates and improves the connectivity of the pads. I made a complete set of unchipped keys using the best keys from both keybeds, washed them all with detergent and warm water, rinsed and dried them. I reassembled one clean, reconditioned keybed.

I removed from each synthesizer the parts that I knew were healthy: the keybed, jack board, bender assembly and dynascan board from A, the main board, power supply, display, switches and other parts from synth B. I cleaned everything using electrical cleaner and contact cleaning spray. The main board has a CR2032 battery to preserve the sounds and programs in memory. I replaced the battery in the board I was using. I used a multi-meter to test and identify the best wiring loom parts from each unit. I laid them all out like a kit. I chose the body panels in best condition from the pair and carefully built up a complete D-50 from the set of parts.

At every stage of assembly, I checked the build against my photos twice to ensure I was following the sequence. When I had finished, I double-checked again, before securing the looms with cable-ties and screwing the bottom panel in place to complete my D-50.


I switched it on. The display lit up. I plugged in a memory card and loaded in the bank of sound programs, all looked well. I played a key and heard pure, clean musical notes, free of crackle and noise. Every key worked, the aftertouch, bender and performance controls all responded. Every switch and function was perfect. I felt like Baron Frankenstein exulting “It lives!!” when his creation awoke. I was delighted. I had built a new D-50 from the remains of two broken ones, for £30.

The best way to celebrate was to record a track using my new D-50 for all instrument sounds except the drums. Here, with permission, is my instrumental cover of a classic D-50 song: Technotronic’s ‘Pump Up The Jam’.
References: Roland.com (2017) Roland D-50 30th Anniversary https://www.roland.com/uk/promos/d-50_30th_anniversary/ ,
Synthxl.com (2018) Roland D 50 Linear Synthesizer https://www.synthxl.com/roland-d-50/

Brilliant!!!! Excellent job – all for 30 quid. Kudos 🙂
LikeLike